


Micro Frontends Demystified: Start Building Modular Web Apps with iFrames and PostMessage
With a demo application setup


In this blog, we will understand what micro-frontends are—an architectural style that's revolutionizing how we build and scale complex web applications. We will delve into the core concepts of micro-frontends, focusing on the integration of independent components using iFrames and the crucial aspect of communication between these components via the postMessage API.
The Micro-Frontend Approach
Micro frontends extend the microservices paradigm to front-end development, allowing teams to break down a monolithic web app into smaller, more manageable pieces. Each piece, or "micro-frontend," can be developed, tested, and deployed independently, fostering agility and efficiency within teams. This approach not only accelerates development cycles but also enhances the scalability and maintainability of web applications.
Why iFrames?
When it comes to integrating micro-frontends into a single application, iFrames offers a straightforward and effective solution. By embedding a micro-frontend as an iFrame within a parent application, developers can create a clear boundary between different parts of the application. This isolation is particularly beneficial for a few reasons:
Independence: iFrames ensure that the CSS, JavaScript, and other resources of one micro-frontend do not interfere with those of the parent application or other micro-frontends.
Simplicity: The process of embedding a micro-frontend into an iFrame is as simple as setting the
srcattribute to the URL of the micro-frontend. This simplicity is invaluable, especially when integrating third-party services or dealing with legacy systems.Security: iFrames provide a sandboxed environment, which can enhance the security of the parent application by limiting the scope of access and interaction between the micro frontend and the parent.
iFrames over Webpack's Module Federation?
While Webpack's Module Federation offers a powerful way to share code and components across micro-frontends dynamically, there are scenarios where using iFrames can provide solutions to challenges that Module Federation might struggle with:
Seamless Integration of Heterogeneous Technologies
- Technology Agnosticism: iFrames are inherently technology-agnostic, meaning they can encapsulate micro-frontends built with any technology stack, without the need for compatibility with the host application's technology. This is particularly useful in scenarios where micro-frontends need to be developed using different frameworks or languages, which Module Federation might find challenging due to its reliance on a shared runtime and module system.
Enhanced Isolation and Security
Complete Runtime Isolation: iFrames offer a level of runtime isolation that goes beyond what Module Federation can provide. Each iFrame runs in a completely separate browser context, which means that global variables, styles, and event handlers are entirely isolated from the parent application and other iFrames. This isolation can prevent issues related to namespace collisions and CSS leakage, which can sometimes be a concern with Module Federation, especially in complex applications with multiple teams working on different features.
Sandboxed Environment: The ability to apply sandbox attributes to iFrames provides an additional layer of security, allowing developers to restrict the actions that the content within the iFrame can perform. This level of control over permissions is something that Module Federation doesn't directly address, as it assumes a level of trust and integration between the codebases it connects.
Integration of Legacy Applications and Third-Party Content
Legacy Compatibility: For organizations with legacy applications that are not built with module bundlers like Webpack, iFrames offers a straightforward path to include these applications as part of a modern micro-frontend architecture without significant refactoring. Module Federation, on the other hand, requires that applications are modular and capable of being bundled, which might not be feasible for older systems.
Third-Party Widgets and Content: iFrames excels at securely integrating third-party widgets and content, such as payment gateways or social media feeds, into a parent application. This encapsulation ensures that third-party code runs independently of the main application, minimizing security risks and potential conflicts. While Module Federation can be used to integrate external modules, it's primarily designed for scenarios where there's a higher degree of trust and control over the code being integrated.
Communication with PostMessage
While iFrames provide a neat solution for integrating micro-frontends, they also introduce challenges in terms of component communication. Since each iFrame is isolated, direct DOM access and JavaScript interaction between the parent and the iFrame are restricted. Here's where the window.postMessage API comes into play, enabling secure cross-origin communication.
UnderstandingpostMessage
The postMessage method enables secure communication between windows and frames from different origins, overcoming the same-origin policy limitations inherent in web browsers. This is particularly useful in micro-frontend architectures where different parts of the application might be developed, hosted, and operated independently.
Key Features ofpostMessage
Cross-Origin Communication:
postMessageallows for communication between documents that have different origins. This is essential for micro-frontends that are hosted on different domains or subdomains.Security: The API is designed with security in mind, allowing senders to specify the origin of the target window, which the receiving side can validate. This prevents unwanted sites from receiving sensitive data.
Flexibility: It can transfer a variety of data types, including strings, objects (using JSON serialization), and more complex structures, making it versatile for different communication needs.
HowpostMessageWorks
Sending Messages: A window or frame can send a message to another window or frame using the
postMessagemethod, which includes the data to be sent and the target origin to ensure security. For example,window.postMessage(data, targetOrigin)wheredatais the message andtargetOriginspecifies where the message is allowed to go.Receiving Messages: The receiving window listens for the
messageevent using an event listener. When a message is received, it can inspect theoriginanddataproperties of the event to ensure it's from an expected source and process the data accordingly.
Use Cases ofpostMessagesMicro-Frontends
State Synchronization: Keep the state of different micro frontends in sync, such as user authentication status or theme preferences.
Event Broadcasting: Communicate user actions or system events across micro frontends, enabling coordinated reactions to user inputs or system changes.
Data Sharing: Facilitate the flow of necessary data between micro frontends, like passing user input from one component to another for further processing.
Best Practices for UsingpostMessage
Validate Origins: Always check the
originproperty of incoming messages to ensure they're from expected sources. This is crucial for preventing security vulnerabilities.Structured Messaging: Define a clear and consistent message structure (e.g., using JSON objects with type and payload properties) to simplify message handling and processing.
Error Handling: Implement robust error handling for message parsing and processing to gracefully manage malformed or unexpected messages.
Efficiency: Be mindful of the volume and frequency of messages. Excessive use of
postMessagecan impact performance, especially if large amounts of data are being transferred or if messages trigger complex processing.
Setting up an app that uses iFrames and postRobot
What are we creating?
We're going to create a simple application where there's a main app, called the container app. This app will show the form data, but the actual form where users can enter information will be in a separate app, called component-one.
The idea here is to build the form in a way that it's separate from the main container app. We'll then place this form component inside the container app using an iFrame. When users fill out this form, we'll use a special package we create ourselves. This package will help both the container app and the component-one app communicate using postMessages. This way, any data entered in the form in component-one can be sent over to the container app. The container app will then take this data, save it, and show what was entered from the form in component-one.
The
postRobotlibrary is a JavaScript library designed to enhance and simplify the use of thewindow.postMessageAPI for cross-origin communication between windows, iframes, or pop-ups in web applications. While the nativepostMessageAPI provides the foundational capability for secure cross-origin communication,postRobotbuilds on this to offer a more developer-friendly interface, advanced features, and improved reliability.
Now, let's move on to setting up a basic structure for our micro-frontend architecture, which includes a main container application and a separate micro-frontend component. This component will be integrated into the container app using iframes. To facilitate seamless communication between the container app and the micro-frontend component, we'll introduce a third module. This module will act as a communication utility leveraging the postRobot library, ensuring efficient messaging across the two applications.
To integrate this communication utility into both the container and the component app, we'll take advantage of the linking feature provided by package managers like Yarn or npm. This feature allows us to link the utility module locally, making it accessible in both applications as if it were a regular dependency.
For serving the content of the micro frontend component to the container app, we'll employ the serve package. This tool will host the built assets of the component app, making them available for the container app to load through an iframe. This setup ensures that the component app's resources are accessible to the container app, allowing for a seamless integration of the micro frontend component within the main application framework.
Application Setup
Basic application initialization
Create a new folder
micro-fe-demoIn this folder, create three new folders, namely:
container
component-one
post-transport
Our container and component-one app is going to be a simple Vite react app and post-transport module is going to be a simple NPM module.
I will be using YARN to build this demo app but you can use NPM if that is your preferred package manager.
Inside the
containerandcomponent-onefolder, runyarn create viteand complete the react + JS app setupOnce the two apps are ready, run
yarninside both the apps to install all the default dependencies for the app to runSince we will be using
serveto host yourcomponent-onebuild that ourcontainerapp will be using, lets also install the serve package globally.Run
yarn global add serve
The
servepackage in JavaScript is a simple static server that allows you to serve static files, such as HTML, CSS, and JavaScript, over the web. It's commonly used during development to quickly host web applications or websites from a local directory without needing to configure a full-fledged web server
- Inside the
post-transportfolder runnpm init -y, this will initialize a new Node.js project in the folder.
post-transport setup
First, install postRobot module by running
yarn add post-robotin the corresponding folderAdd the following code in
index.jsof this app
import * as postRobot from 'post-robot';

export const sendMessage = async (targetWindow, messageType, messageData) => {
  return postRobot
    .send(targetWindow, messageType, messageData)
    .then((response) =>
      console.log('Message sent successfully:', response.data)
    )
    .catch((error) => console.error('Error sending message:', error));
};

export const setupListener = (messageType, callback) => {
  const listener = postRobot.on(messageType, (event) => {
    callback(event.data);
    return { status: 'Received successfully' };
  });

  // Return the listener for potential cancellation
  return listener;
};
Using the terminal, in the active directory, run
yarn linkCopy the link command that you see as a result of the above command (you will see something like
yarn link post-transport). We will use this to utilise this module in ourcontainerapp andcomponent-oneapp once that is ready.
Container (main app) setup
- Inside the
src/App.jsxof this folder add the following code:
import { useState, useEffect } from 'react';
import { setupListener } from 'post-transport';

function App() {
  const [formData, setFormData] = useState({});

  const containerStyle = {
    display: 'flex',
    flexDirection: 'column',
    alignItems: 'center',
    justifyContent: 'center',
    margin: '20px',
    borderRadius: '5px',
    border: '1px solid #ccc',
  };

  const dataDisplayStyle = {
    marginTop: '20px',
    padding: '10px',
    border: '1px solid #ccc',
    borderRadius: '5px',
  };

  useEffect(() => {
    const listener = setupListener('formSubmit', (data) => {
      setFormData(data);
    });

    return () => listener.cancel();
  }, []);

  return (
    <div className='App' style={containerStyle}>
      <h1>Main Application</h1>
      <iframe
        src='http://localhost:3000'
        title='Child Application'
        style={{
          width: '300px',
          height: '300px',
          border: '1px solid #ccc',
          borderRadius: '5px',
        }}
      ></iframe>
      <div style={dataDisplayStyle}>
        <h2>Received Form Data:</h2>
        <p>Name: {formData.name}</p>
        <p>Email: {formData.email}</p>
      </div>
    </div>
  );
}

export default App;
- In the terminal of the corresponding folder run
yarn link post-transport, this will make our custom transport module available in the application to be imported for use.
Component-one (form component) setup :
- In the
srcfolder of this repo, create a new componentFormComponent.jsxand add the following code:
import { useState } from 'react';
import { sendMessage } from 'post-transport';

function FormComponent() {
  const [formData, setFormData] = useState({
    name: '',
    email: '',
  });

  const formStyle = {
    display: 'flex',
    flexDirection: 'column',
    alignItems: 'center',
    justifyContent: 'center',
    margin: '50px',
    padding: '10px',
    border: '1px solid #ccc',
    borderRadius: '5px',
  };

  const inputStyle = {
    margin: '10px 0',
    padding: '10px',
    width: '80%',
    borderRadius: '5px',
    border: '1px solid #ccc',
  };

  const buttonStyle = {
    padding: '10px 20px',
    cursor: 'pointer',
    borderRadius: '5px',
    border: 'none',
    backgroundColor: '#007bff',
    color: 'white',
  };

  const handleChange = (e) => {
    const { name, value } = e.target;
    setFormData((prevState) => ({
      ...prevState,
      [name]: value,
    }));
  };

  const handleSubmit = (e) => {
    e.preventDefault();
    sendMessage(window.parent, 'formSubmit', formData);
  };

  return (
    <form onSubmit={handleSubmit} style={formStyle}>
      <input
        type='text'
        name='name'
        placeholder='Name'
        value={formData.name}
        onChange={handleChange}
        style={inputStyle}
      />
      <input
        type='email'
        name='email'
        placeholder='Email'
        value={formData.email}
        onChange={handleChange}
        style={inputStyle}
      />
      <button type='submit' style={buttonStyle}>
        Submit
      </button>
    </form>
  );
}

export default FormComponent;
- In
src/App.jsxuse this component like this:
import FormComponent from './FormComponent';

function App() {
  return (
    <>
      <h2 style={{ display: 'flex', justifyContent: 'center' }}>
        Child Component
      </h2>
      <FormComponent />
    </>
  );
}

export default App;
In the terminal of the corresponding folder run
yarn link post-transport, this will make our custom transport module available in this component repo to be imported for use.Add the following
scriptto the package.json:
  "scripts": {
    ...
    "build": "vite build",
    "serve:build": "vite build && yarn serve -s dist"
  },
The
serve:buildthe script first builds the react app and serves the bundled code by default on localhost:3000This is the same source that is loaded in the iFrame of the
conatinerapp above.
Run the app and test it
In the container folder, run
yarn devIn the component-one folder, run
yarn serve:build
Your application should be up and running now
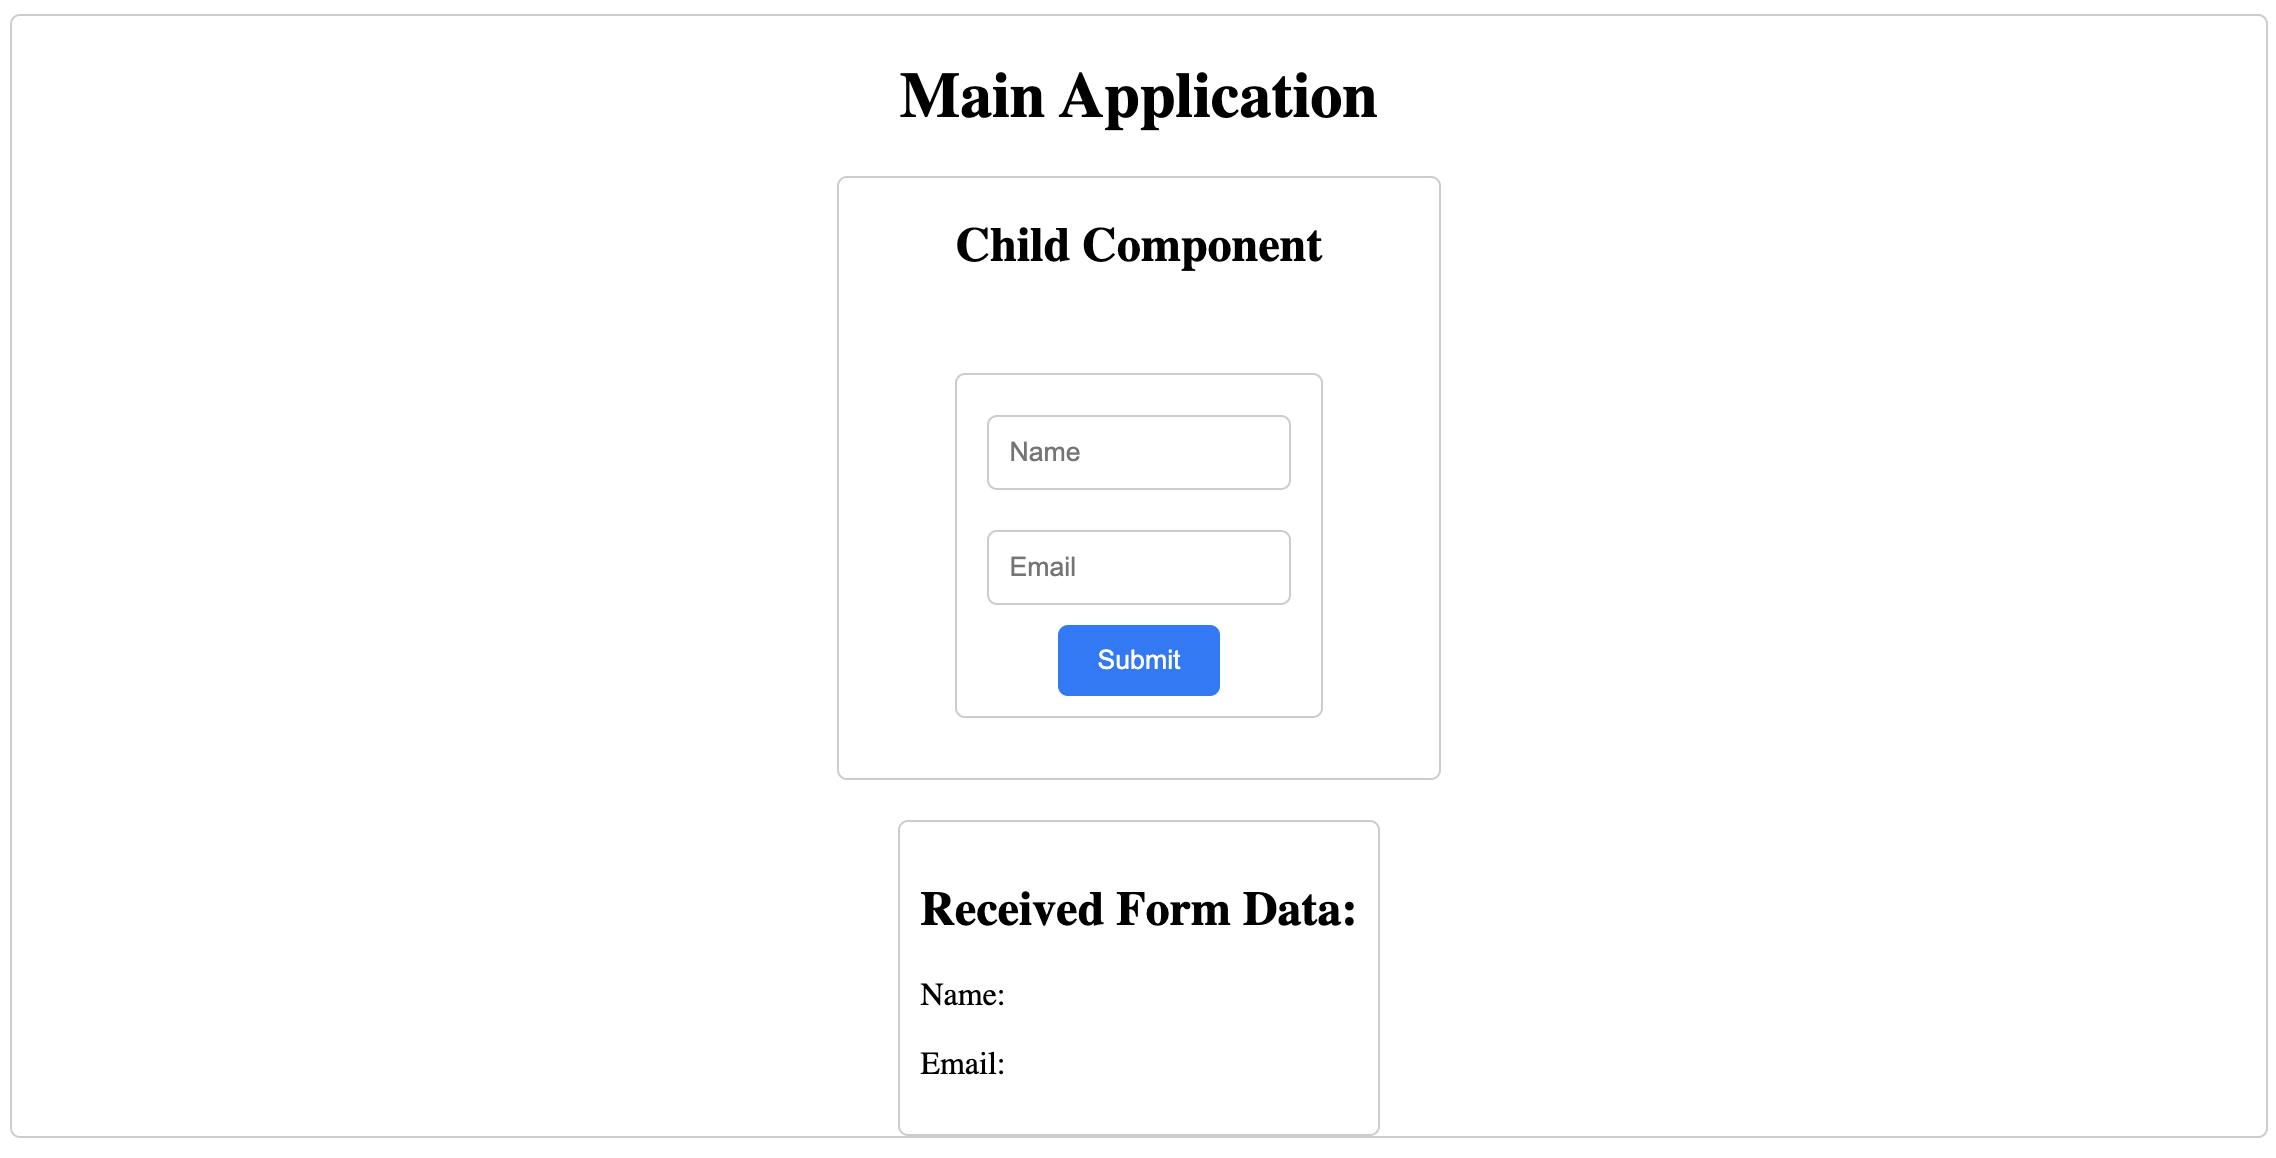
Add values to the Input fields and hit the submit button
You will see that the values added in the form component are received in the main application and rendered on the screen.

And there you go. We have set up a simple micro-frontend application with the usage of iFrame and data communication across different origins using postRobot library.
Conclusion
This demo serves as a foundational guide to understanding the concept of micro-frontends, utilizing iframes and postMessages for component integration and communication. It's important to note that this is just the beginning; actual implementation and transitioning the code to a production environment come with their own set of challenges. However, this demo provides a solid starting point for exploring this architectural approach. It prepares your development setup for tackling more complex projects, setting the stage for building larger, more sophisticated applications.