

Creating three simple micro-services using NodeJS and deploying them using Docker + Kubernetes
This is a beginner level walkthrough that involves setting up three nodejs micro-services, swagger docs, docker containerization and k8s deployment


About Application
Description
This is a microservices-based application built using Node.js and MongoDB. The application consists of three microservices - User, Product, and Order - each of which is deployed as a separate Docker container. The User service is responsible for managing user data, the Product service is responsible for managing product data, and the Order service is responsible for managing order data.
All three services communicate with the same MongoDB database, but each has its own collection.
The User service makes use of the Product service and Order service to allow users to add products to their wishlist and confirm their order. The Product service is independent and does not use any other services. The Order service stores references to the IDs of the user and products associated with each order.
All services are containerized using Docker and communicate with each other over a private network. The application can be deployed and scaled easily by spinning up multiple instances of each service as needed.
In this application, Swagger has been used to provide detailed descriptions of each endpoint in each microservice. This documentation makes it easy to understand how to use the API, and it reduces the amount of time required for developers to read and understand the source code.
The Swagger documentation for each microservice is available through the Swagger UI, which is a web-based tool that provides a user-friendly interface for interacting with the API. The Swagger UI is accessible through a web browser by visiting the appropriate URL for each microservice.
The Swagger documentation for the User service is available at http://localhost:3000/api-docs/,
The Swagger documentation for the Product service is available at http://localhost:4000/api-docs/. Similarly, the Swagger documentation for the Order service is available at http://localhost:5001/api-docs/.
NOTE: PORT 3000, 4000, 5001 are accessible when the the services are run locally using nodejs. For the docker containers these ports are exposed and mapped to PORT 3001, 3002, 3003 respectively. More about this is mentioned in the section where dockerfiles are explained.
API Endpoints
The User service provides the following endpoints:
GET /users - retrieves all users from the database
GET /user/:id - retrieves a user by ID
POST /user - creates a new user in the database
PUT /user/:id - updates a user by ID
DELETE /user/:id - deletes a user by ID
POST /user/wishlist/:userId/:productId - adds a product to the wishlist of the specified user
POST /user/order/:userId - confirms the order for the products in the wishlist of the specified user
The Product service provides the following endpoints:
GET /products - retrieves all products from the database
GET /product/:id - retrieves a product by ID
POST /product - creates a new product in the database
PUT /product/:id - updates a product by ID
DELETE /product/:id - deletes a product by ID
The Order service provides the following endpoints:
GET /orders - retrieves all orders from the database
GET /order/:id - retrieves an order by ID
GET /orders/user/:userId - retrieves all orders for the specified user
POST /order - creates a new order in the database
DELETE /order/:id - deletes an order by ID
Relationship between the services
A. UserService
The User service is responsible for managing user data, including creating new users, updating user information, and deleting users. In addition to these standard user management functions, the User service provides the ability for users to add products to their wishlist and confirm their order. These additional functions rely on the Product and Order services.
B. Product Service
The Product service is an independent service that manages product data, including creating new products, updating product information, and deleting products. It does not rely on any other services and can operate independently.
C. Order Service
The Order service is responsible for managing order data, including creating new orders and deleting orders. The Order service stores references to the IDs of the user and products associated with each order. When a user confirms their order using the User service, the Order service is called to create a new order and store the appropriate user and product IDs.
D. Interservice Communication
All services are containerized using Docker, which provides a lightweight, portable way to package and deploy the services. The services communicate with each other over a private network, which ensures that the communication between services is secure and isolated from the outside world.
Because the services are containerized and communicate over a private network, the application can be easily scaled up or down as needed. Additional instances of each service can be spun up to handle increased traffic or demand, and the services can be scaled back down when demand decreases. This allows the application to remain performant and responsive, even under heavy load.
Database and Strategy
MongoDB is used in this application as the primary database for storing and managing data across all three microservices - User, Product, and Order. MongoDB is a NoSQL document-oriented database that provides flexible and scalable storage for unstructured data. In this application, MongoDB is used to store data in a collection format, with each collection representing a specific data type - user, product, or order.
Each microservice uses a dedicated MongoDB collection to store and retrieve data. When a new record is created in a microservice, it is stored as a document in the appropriate MongoDB collection. The document format allows the data to be easily structured, indexed, and queried. The use of MongoDB as the primary database provides several benefits for this type of application:
1. Flexible data structure: MongoDB allows for flexible and dynamic data structures, which is particularly useful in applications where data requirements may change frequently.
2. Scalability: MongoDB is designed to scale easily and can handle large volumes of data and high write loads.
3. High availability: MongoDB supports automatic failover and data replication, ensuring that data remains available even in the event of hardware failures or other issues.
4. Performance: MongoDB is designed to provide high performance and low latency, making it well-suited for use in applications where speed is critical.
In addition to providing a primary database for the application, MongoDB also provides a rich set of features and tools for managing and analyzing data. For example, MongoDB provides a powerful query language that allows for complex queries and aggregations, as well as a variety of indexing options to optimize performance. MongoDB also provides a range of monitoring and management tools that can be used to optimize database performance, diagnose issues, and ensure high availability.
Dockerfile configuration (per service)
// userservice dockerfile

FROM node:14
WORKDIR /
COPY package*.json ./
RUN npm install
COPY . .
EXPOSE 3000
CMD ["npm", "start"]
// productservice dockerfile

FROM node:14
WORKDIR /
COPY package*.json ./
RUN npm install
COPY . .
EXPOSE 4000
CMD ["npm", "start"]
// orderservice dockerfile

FROM node:14
WORKDIR /
COPY package*.json ./
RUN npm install
COPY . .
EXPOSE 5001
CMD ["npm", "start"]
Deployment Steps
Since all the three services are build in NodeJS, the deployment and testing steps are common for all. In this documentation we will be seeing the steps for User Service. Following the same steps the other two services can be tested as well.
- Local NodeJS Server
set the current working directory to
users/$ npm run dev

Server listening on http://localhost:3000
Check http://localhost:3000/api-docs/ for API documentation powered by Open API (swagger)

- Testing
GETendpoint using Postman

- Similarly, all other endpoints for user service or other two services can be tested following the Open API docs or using the endpoints mentioned in the introduction of this documentation report.
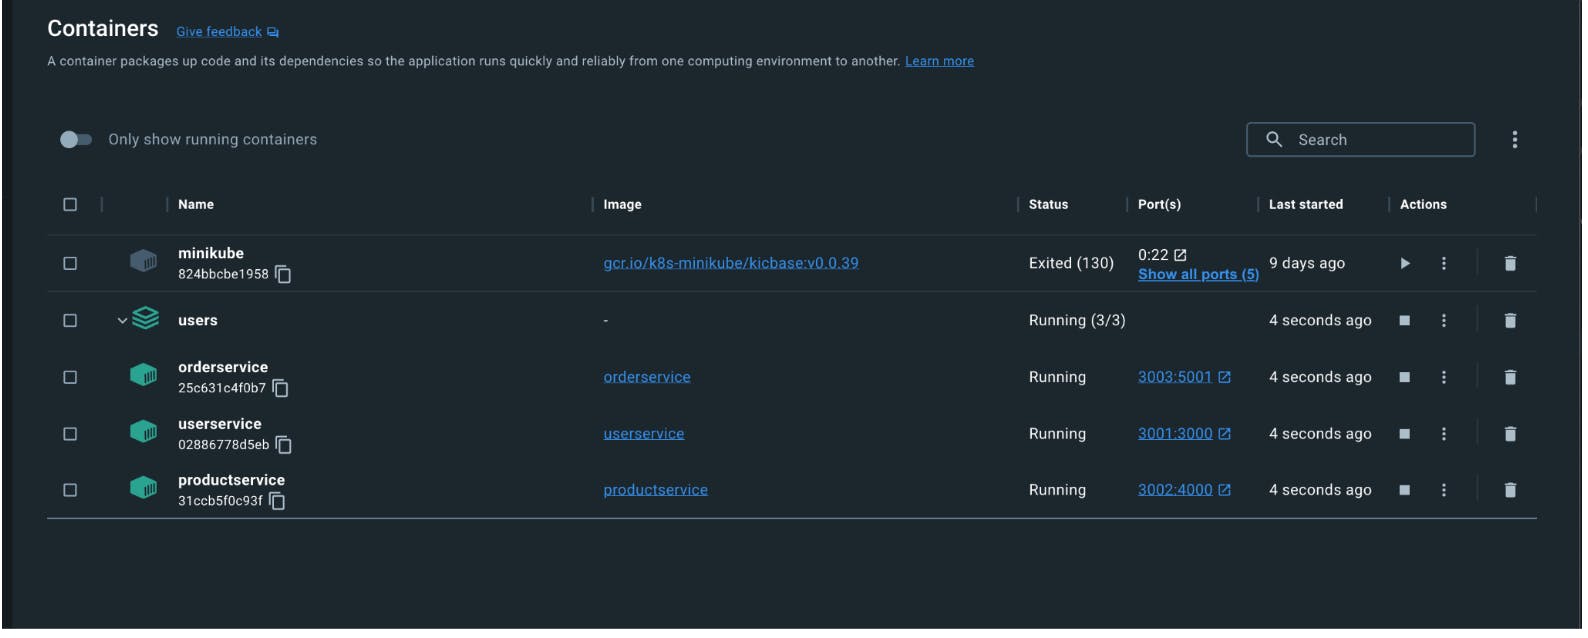
- Docker Image and Container
Every microservice in a different container:
Create a new docker image for the services from the respective working directories:
$ docker build -t userservice .
$ docker build -t productservice .
$ docker build -t orderservice .

- Run the Docker container with the image from the respective working directories:
$ docker run -p 3001:3000 userservice
$ docker run -p 3002:4000 productservice
$ docker run -p 3003:5001 orderservice

Containerized services can be tested for userservice, productservice and orderservice respectively, by hitting the following endpoints:
http://localhost:3001/api-docs/
localhost:3002/api-docshttp://localhost:3003/api-docs/
Every microservice grouped under a single network:
Create a new network:
$ docker network create <name>
$ docker network create micronetworkIf the images are not already created for each of the services create them using:
$ docker build -t userservice .$ docker build -t productservice$ docker build -t orderservice .
- Create a new
docker-compose.yamlfile to orchestrate the three services to run together under the same network namedmicronetwork
version: '3.8'

services:
  userservice:
    image: userservice
    container_name: userservice
    networks:
      - micronetwork
    ports:
      - "3001:3000"

  productservice:
    image: productservice
    container_name: productservice
    networks:
      - micronetwork
    ports:
      - "3002:4000"

  orderservice:
    image: orderservice
    container_name: orderservice
    networks:
      - micronetwork
    ports:
      - "3003:5001"

networks:
  micronetwork:
    driver: bridge
- Run docker-compose in the repository where the compose file exists:
$ docker-compose up -d
Containerized services can be tested for userservice, productservice and orderservice respectively, by hitting the following endpoints:
http://localhost:3001/api-docs/
localhost:3002/api-docs
- Container deployment with Kubernetes
Deploy the microservice container images to docker hub by doing the following:
User service:
$ docker tag userservice adeeshsharma/userservice$ docker push adeeshsharma/userserviceProduct Service:
$ docker tag productservice adeeshsharma/productservice$ docker push adeeshsharma/productserviceOrder Service:
$ docker tag orderservice adeeshsharma/productservice$ docker push adeeshsharma/productservice

- Create 2 new
yamlfiles for Kubernetes deployment and service configuration (has to be done for all 3 services but for this example we will only be doing it for the userservice)
// userservice-deployment.yaml

apiVersion: apps/v1
kind: Deployment
metadata:
  name: userservice-deployment
  labels:
    app: userservice
spec:
  replicas: 1
  selector:
    matchLabels:
      app: userservice
  template:
    metadata:
      labels:
        app: userservice
    spec:
      containers:
        - name: userservice
          image: adeeshsharma/userservice
          ports:
            - containerPort: 3000
// userservice-service.yaml

apiVersion: v1
kind: Service
metadata:
  name: userservice
spec:
  selector:
    app: userservice
  type: LoadBalancer
  ports:
    - protocol: TCP
      port: 5000
      targetPort: 3000
      nodePort: 31110
Apply these configurations by running the following:
$ kubectl apply -f k8s/userservice-deployment.yaml$ kubectl apply -f k8s/userservice-service.yamlOpen minikube dashboard and see the status
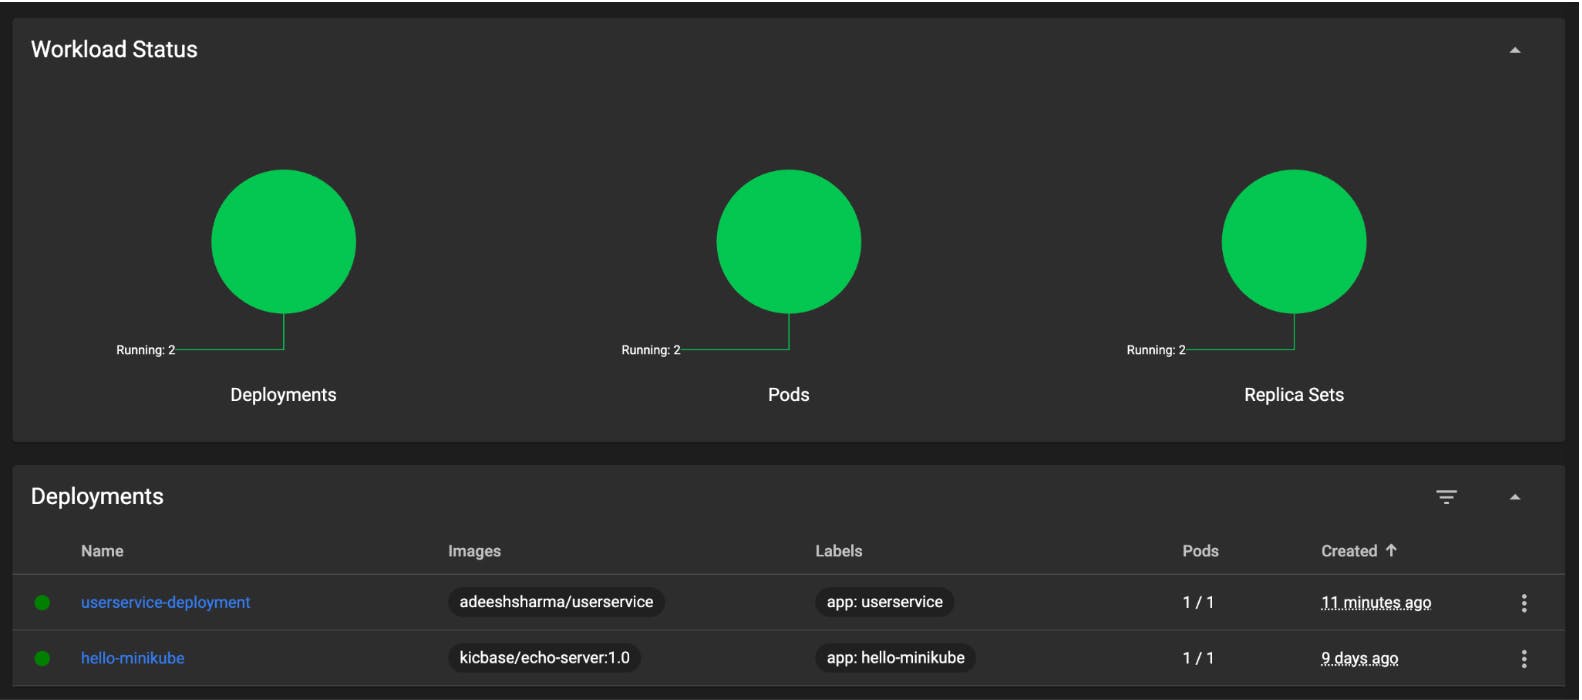

- Use
$ kubectl get servicesto get all the running service details

- Run
$ minikube service userserviceto fire up the service

The service starts running on http://127.0.0.1:56444/
Test the service using http://127.0.0.1:56444/api-docs/

- The user service is now running using docker image used from dockerhub and orchestrated by kubernetes
NOTE: Repeat the same steps with respective configuration yaml files for productservice and orderservice to get the entire application up and running user kubernetes and docker images.
Links
User service: https://github.com/adeeshsharma/scalableservices-user
Product Service: https://github.com/adeeshsharma/scalableservices-product
Order Service: https://github.com/adeeshsharma/scalableservices-order
NOTE*: docker-compose.yaml resides in the user service repository*