


Building an Express, tRPC and React monorepo setup with yarn workspaces, tailwind, zod and react-query
For seamless end-to-end communication between type-safe systems


Table of contents
Introduction
In this article, we will see what tRPC is, what benefits it provides and how we can set up a monorepo project with an Express backend serving tRPC requests and a React client using tRPC to query and mutate data. In the demo, we will be building a simple chat mechanism that fetches some data from the backend (query) and updates the data from the frontend (mutate).
React-Query:
React-Query is a library for React.js that offers data fetching that is more straightforward and state management for remote data. It offers hooks and components for dealing with the data retrieval, caching, and updating in response to user interactions and other application events. React-Query offers capabilities like automatic data fetching and caching, request deduplication, and simple error handling, and works seamlessly with the React.js environment. It is made to make it simple for developers to create scalable, high-performance web apps with less boilerplate code.
Zod:
Zod is a JavaScript type manipulation and validation library. It offers a straightforward and expressive method for defining, verifying, and manipulating data in JavaScript. Zod is type-safe, which means that it guards against runtime errors by checking data at runtime and warning the developer if there are any mistakes. With Zod, developers can create sophisticated validation schemas that may be used for a variety of purposes, from straightforward data validation to intricate business logic. Zod is a preferred option for many developers because it is made to be quick, light, and simple to use.
What is tRPC?
Characteristics
tRPC is a communication protocol that enables functions or processes to be carried out on a distant system as if they were being carried out locally. It is created using TypeScript, a superset of JavaScript that is statically typed.
Some of its most important traits include:
TypeScript support: tRPC is specifically designed to work with TypeScript, making it easy to write and maintain code.
Performance: tRPC allows for fast communication between systems, making it suitable for real-time applications.
Interoperability: tRPC is specifically designed for TypeScript and provides seamless end-to-end type-safe communication between frontend and backend systems.
How it works
A client and a server establish remote procedure calls to carry out tRPC operations. The client requests that the server carry out a particular procedure, and the server carries out the request and sends back the results to the client. The functionality of the server can thus be accessed and used by the client as if it were a local resource, enabling real-time communication and data exchange between the two systems.
Use cases
tRPC is commonly used in a variety of applications, including:
Real-time applications, such as gaming and multimedia streaming, where fast and secure communication is essential.
Distributed systems, where multiple systems need to communicate with each other and exchange information.
Microservices architecture, where different services need to interact with each other and exchange data.
Remote access to databases, where clients need to access data stored on a remote server.
A quick comparison with GraphQL, Rest and gRPC
Focus: tRPC focuses on executing procedures on a remote server in a type-safe manner, while GraphQL focuses on querying data from a server, REST focuses on accessing and manipulating resources on a server, and gRPC focuses on executing procedures on a remote server using Protocol Buffers.
Data encoding: TRPC typically uses JSON or XML to encode its data, while GraphQL uses a custom query language, REST uses standard HTTP methods, and gRPC uses Protocol Buffers.
Communication: TRPC allows for real-time communication between systems, while GraphQL, REST, and gRPC also support real-time communication, but with different capabilities and limitations.
Project Setup
Setting up the monorepo with backend and frontend packages
Create a new project folder and name it whatever you like, I am naming mine
trpc-react.Open this folder in your favourite code editor, I am using vs-code.
In the project folder create a new file
package.jsonand past the following content inside it:
{
  "name": "packages",
  "version": "1.0.0",
  "main": "index.js",
  "license": "MIT",
  "private": true,
  "scripts": {
    "start": "concurrently \"wsrun --parallel start\""
  },
  "workspaces": [
    "packages/*"
  ],
  "devDependencies": {
    "concurrently": "^5.2.0",
    "wsrun": "^5.2.0"
  }
}
Create a new folder inside the root folder, next to the
package.json, the name of my folder ispackages/Now we need to create two projects inside the
packages/, one for the backend and other for the frontend.Inside
packages/runnpx create-mf-appcreate-mf-app Creates a Module Federation application, API server, or library based on one of multiple different templates. These projects are not production complete. They are designed as lightweight projects that can be used to quickly prototype a new feature or library.
After running the command, you will be prompted with a series of questions to select the template you want to start with. First will be our backend app, I am naming it
api-server, the template type will beAPI-ServerwithExpressNext we will create our frontend app. Inside
packages/runnpx create-mf-appagain and this time i am naming itclient, the template type will beApplication>React>TypeScript>TailwindOnce both packages have been created, go back into the root directory and run
yarn. This will install the modules needed by bothapi-serverandclientand maintain the dependencies centrally following the monorepo structure.
Installing the needed frontend and backend dependencies
Before installing the dependencies, we will need to initialize the typescript compiler in both the packages to get the
tsconfig.json. We can do this by runningnpx tsc --initinside bothapi-server/andclient/Inside
client/tsconfig.json, find and uncomment"jsx": "preserve"
The
preservemode will keep the JSX as part of the output to be further consumed by another transform step (e.g. Babel). Additionally, the output will have a .jsx file extension.
Inside
api-serverrunyarn add @trpc/server zod corsto get the needed dependencies- Cors doesn't come with types out of the box run
yarn add @types/cors -Dto install the types and save them as a dev dependency.
- Cors doesn't come with types out of the box run
While we are at the server side, open
api-server/package.jsonand add a new property"main": "index.ts"We can also add
ts-node-devby runningyarn add ts-node-dev, this when prefixed in our start script will continuously watch for changes and refire the server without having us do it manually every time we make a change.This is how the
api-server/package.jsonwould be looking at this point:
{
  "name": "api-server",
  "version": "1.0.0",
  "license": "MIT",
  "main": "index.ts",
  "scripts": {
    "start": "ts-node-dev index.ts"
  },
  "dependencies": {
    "@trpc/server": "^10.9.0",
    "cors": "^2.8.5",
    "express": "^4.17.1",
    "zod": "^3.20.2"
  },
  "devDependencies": {
    "@types/cors": "^2.8.13",
    "@types/express": "^4.17.13",
    "ts-node": "^10.4.0",
    "ts-node-dev": "^2.0.0",
    "typescript": "^4.4.4"
  }
}
Moving to the frontend, inside
client/add theapi-serveras a dependency with the accurate version by runningyarn add api-server@1.0.0Next, run
yarn add @trpc/client @trpc/react react-query @tanstack/react-query zodto get trpc client, react-query and zod dependencies.That's about it with all the dependency setup. At this point, this is how the
client/package.jsonshould be looking:
{
  "name": "client",
  "version": "1.0.0",
  "scripts": {
    "build": "webpack --mode production",
    "build:dev": "webpack --mode development",
    "build:start": "cd dist && PORT=3000 npx serve",
    "start": "webpack serve --open --mode development",
    "start:live": "webpack serve --open --mode development --live-reload --hot"
  },
  "license": "MIT",
  "author": {
    "name": "Adeesh"
  },
  "devDependencies": {
    "@babel/core": "^7.15.8",
    "@babel/plugin-transform-runtime": "^7.15.8",
    "@babel/preset-env": "^7.15.8",
    "@babel/preset-react": "^7.14.5",
    "@babel/preset-typescript": "^7.10.4",
    "@types/react": "^17.0.2",
    "@types/react-dom": "^17.0.2",
    "autoprefixer": "^10.1.0",
    "babel-loader": "^8.2.2",
    "css-loader": "^6.3.0",
    "html-webpack-plugin": "^5.3.2",
    "postcss": "^8.2.1",
    "postcss-loader": "^4.1.0",
    "style-loader": "^3.3.0",
    "tailwindcss": "^2.0.2",
    "typescript": "^4.5.2",
    "webpack": "^5.57.1",
    "webpack-cli": "^4.9.0",
    "webpack-dev-server": "^4.3.1"
  },
  "dependencies": {
    "@tanstack/react-query": "^4.23.0",
    "@trpc/client": "^10.9.0",
    "@trpc/react": "^9.27.4",
    "@trpc/react-query": "^10.9.0",
    "api-server": "1.0.0",
    "react": "^17.0.2",
    "react-dom": "^17.0.2",
    "react-query": "^3.39.3",
    "zod": "^3.20.2"
  }
}
Backend source code setup
- Add the following code to
api-server/index.ts
import express from 'express';
import { initTRPC, inferAsyncReturnType } from '@trpc/server';
import * as trpcExpress from '@trpc/server/adapters/express';
import cors from 'cors';
import { z } from 'zod';

// Chat message interface
interface ChatMessage {
  user: string;
  message: string;
}

const messages: ChatMessage[] = [
  { user: 'user1', message: 'Hello' },
  { user: 'user2', message: 'Hi' },
];

const app = express();

// to allow communication between port 8080/server and 3000/client
app.use(cors());
const port = 8080;

// create an empty context | otherwise used for something like authentication
const createContext = ({
  req,
  res,
}: trpcExpress.CreateExpressContextOptions) => ({}); // no context
type Context = inferAsyncReturnType<typeof createContext>;

// initializing trpc
const t = initTRPC.context<Context>().create();
const router = t.router;
const publicProcedure = t.procedure;

// creating a router with procedure
const appRouter = router({
  greeting: publicProcedure.query(() => 'Hello from tRPC!'),
  getMessages: publicProcedure
    .input(z.number().default(10))
    .query(({ input }) => messages.slice(-input)), // get last 10 messages w.r.t default input
  addMessage: publicProcedure
    .input(
      z.object({
        user: z.string(),
        message: z.string(),
      })
    )
    .mutation(({ input }) => {
      messages.push(input);
      return input;
    }),
});

// exporting trpc types to maintain end-to-end types | to be used by client
export type AppRouter = typeof appRouter;

// middleware to intercept any requests coming for trpc
app.use(
  '/trpc',
  trpcExpress.createExpressMiddleware({
    router: appRouter,
    createContext,
  })
);

// standard REST endpoint
app.get('/hello', (req, res) => {
  res.send('Hello from api-server');
});

app.listen(port, () => {
  console.log(`api-server listening at http://localhost:${port}`);
});
- Believe it or not, that is the entire backend code for this setup and simple chat mechanism demo.
Frontend source code setup
- Create a new file
client/src/trpc.tswith the following content:
import { createTRPCReact } from '@trpc/react-query';
import { AppRouter } from 'api-server';

export const trpc = createTRPCReact<AppRouter>();
- Inside
client/src/App.tsxthese should be imports:
import React, { useState } from 'react';
import ReactDOM from 'react-dom';
import { QueryClient, QueryClientProvider } from '@tanstack/react-query';
import { trpc } from './trpc';
import { httpBatchLink } from '@trpc/client';
import './index.scss';
- The
trpc.ProviderandQueryClientProviderneed to wrap our main application content so that thetrpcClientandqueryClientare both available to the app content for data caching and using the trpc for query and mutations.
const App = () => {
  const [trpcClient] = useState(() =>
    trpc.createClient({
      links: [
        httpBatchLink({
          url: 'http://localhost:8080/trpc',
        }),
      ],
    })
  );
  return (
    <trpc.Provider client={trpcClient} queryClient={queryClient}>
      <QueryClientProvider client={queryClient}>
        <AppContent />
      </QueryClientProvider>
    </trpc.Provider>
  );
};

ReactDOM.render(<App />, document.getElementById('app'));
- Once the App is ready, we can create the AppContent to demonstrate the usage of tRPC
// Manages cache on react-query side
const queryClient = new QueryClient();

const AppContent = () => {
  // states to maintain a new user and message
  const [user, setUser] = useState('');
  const [message, setMessage] = useState('');

  // querying the greeting prodecure
  const greeting = trpc.greeting.useQuery();

  // querying the getMessages procedure, which by default returns last 10 messages
  const getLastTenMessages = trpc.getMessages.useQuery();

  // querying the getMessages procedure with an argument, which returns last message
  const getLastMessage = trpc.getMessages.useQuery(1);

  // create and addMessage procedure call which can be used to mutate data
  const newMessage = trpc.addMessage.useMutation();
  const addMessage = () => {
    newMessage.mutate(
      {
        user: user,
        message: message,
      },
      {
        onSuccess: () => {
          queryClient.invalidateQueries();
        },
      }
    );
  };

  return (
    <div className='mt-10 text-3xl mx-auto max-w-6xl'>
      <div>{JSON.stringify(greeting.data)}</div>
      <br />
      <p className='text-red-400 underline mb-2'>Last 10 Messages</p>
      <div>
        {(getLastTenMessages.data ?? []).map((row) => (
          <div key={row.message}>{JSON.stringify(row)}</div>
        ))}
      </div>
      <br />
      <p className='text-red-400 underline mb-2'>Last Message</p>
      <div>{JSON.stringify(getLastMessage.data)}</div>
      <br />
      <p className='text-red-400 underline mb-2'>Add New Message</p>
      <div className='mt-10 mb-5'>
        <input
          type='text'
          value={user}
          onChange={(e) => setUser(e.target.value)}
          className='p-5 border-2 border-gray-300 rounded-lg w-full'
          placeholder='User'
        />
        <input
          type='text'
          value={message}
          onChange={(e) => setMessage(e.target.value)}
          className='p-5 border-2 border-gray-300 rounded-lg w-full'
          placeholder='Message'
        />
      </div>
      <button
        className='border hover:bg-green-400 bg-green-700 text-white rounded-lg px-2'
        onClick={addMessage}
      >
        Add
      </button>
    </div>
  );
};
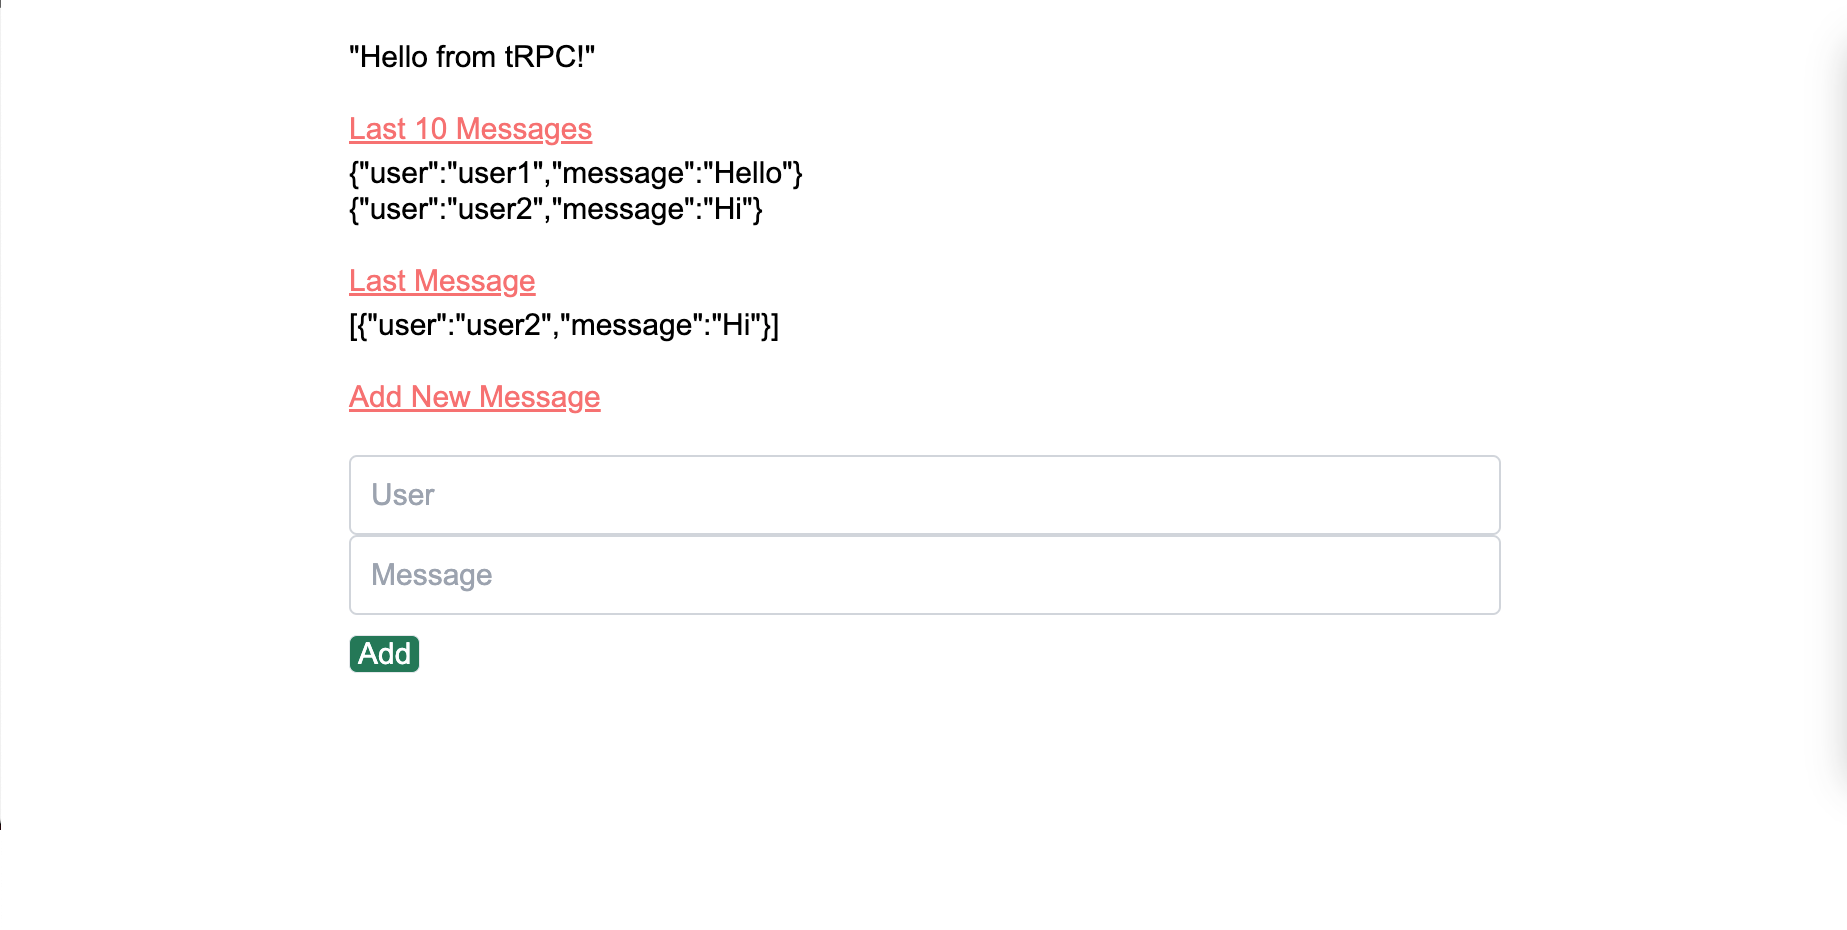
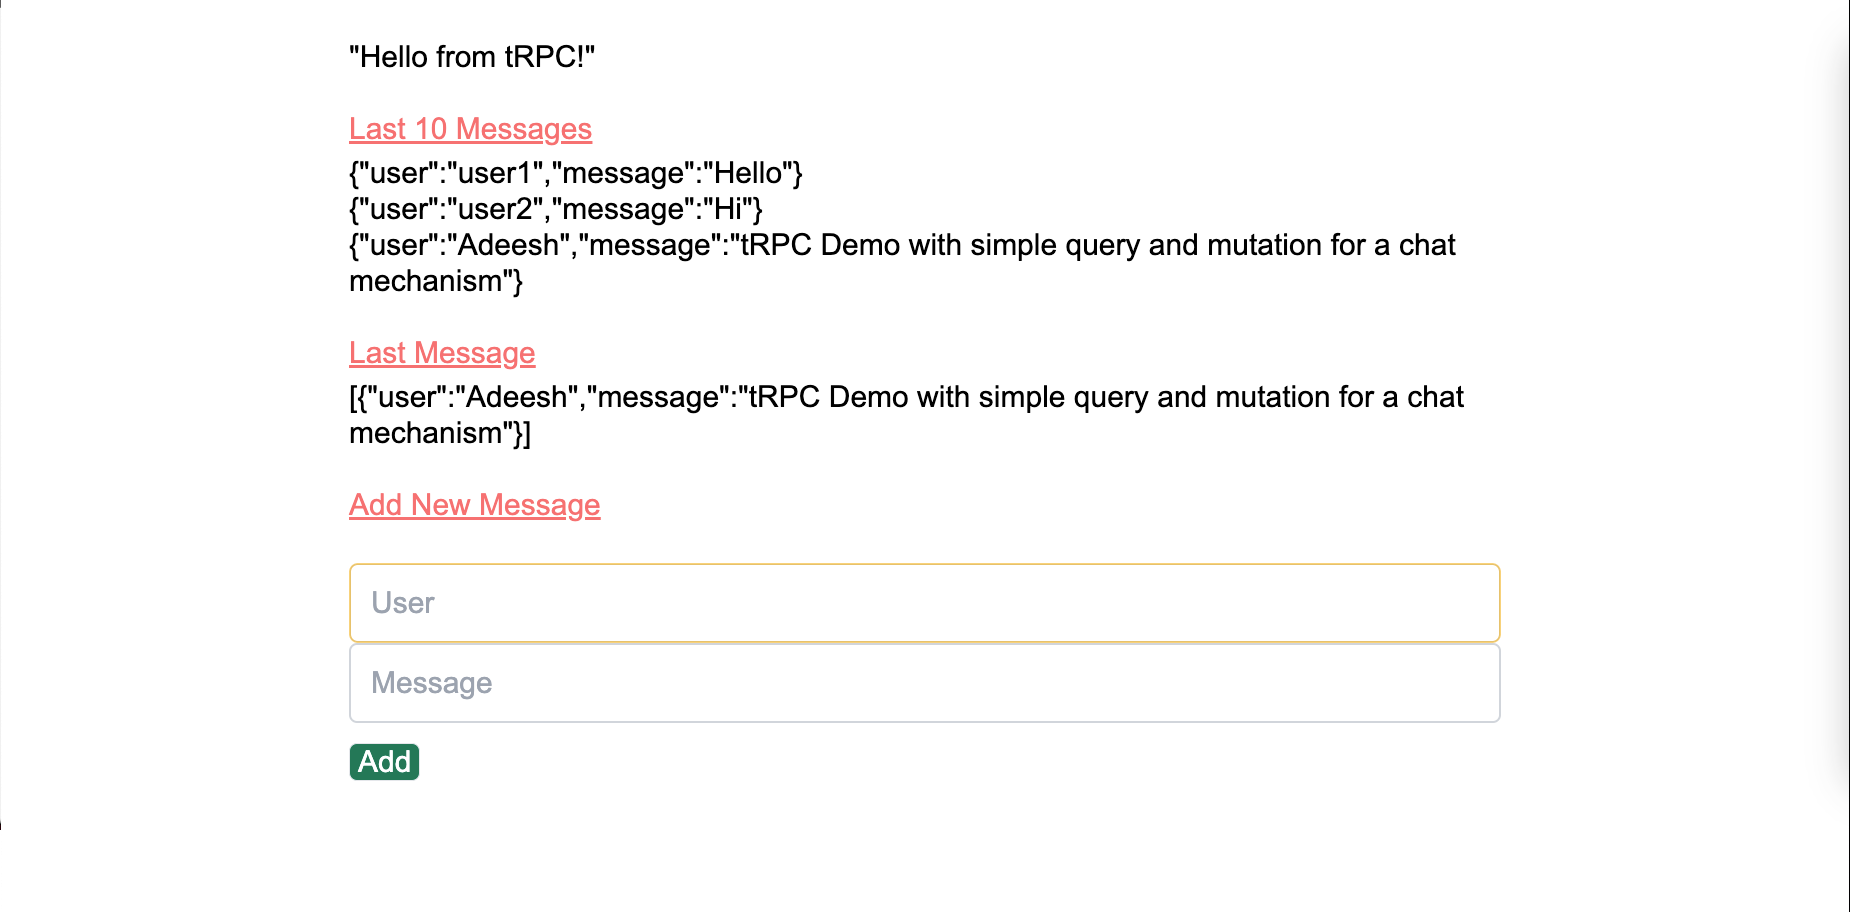
- And that's all the code, run
yarn startin the root and your application should fire up looking like this:

Conclusion
tRPC is a TypeScript remote procedure call framework designed for building scalable, high-performance applications. Its defining characteristics include its ability to define procedures that can be executed remotely, its seamless integration with TypeScript systems, and its support for real-time communication and data exchange. tRPC's use cases include applications that require real-time communication and data exchange between systems, as well as applications that require robust and scalable APIs. By using tRPC, developers can take advantage of its features to build fast and reliable applications, while also reducing the complexity and time involved in setting up a new project.